Google Maps
Free from the iPhone App Store (iOS) or Google Play (Android)
If concern about losing your way has kept you from fully exploring Marblehead’s open spaces, your worries are over. Thanks to Google Maps, your phone is now smart enough to help find your location. The Conservancy has long published paper trail maps, but paper is missing the all-important blue dot that tells you where you are and that moves along the trail as you do. (See Screen 1)
In early versions of Google Maps, Marblehead’s open spaces were “terra incognita” – large green blank spaces on the map. In the current version, trails are clearly marked and, when they have names, they’re labeled. And while Google has always provided a satellite view with aerial photographs, you can now see shadows that show hills and valleys.
Here’s how to access all this power. If you haven’t already downloaded the Google Maps app, that’s the first step. The app is available for both Apple and Android platforms. Make sure you have the latest version and that you allow the map to use your current location so you can see the blue dot that says “you are here”.
The second step is the easiest and the best: go for a hike in one of Marblehead’s open spaces. Once you’re on the trail, open the Google Maps app, press the “show my current location” button (it looks like a compass rose and is in the lower right corner of the screen) and the map will be redrawn with you in the center represented by a blue dot. If you look carefully, you will also see a small triangle pointer on the dot’s edge that shows which way your phone is pointing. Don’t be concerned if your blue dot isn’t precisely on a trail. GPS systems rely on a network of satellites and are only accurate to about 15 feet. A forest canopy can interfere with the satellite’s signal and introduce further errors. (Some phones also use WiFi signals in a local area to give more precise locations, but open spaces don’t tend to have lots of WiFi stations, so this technique doesn’t work as well on the trail.) Even if your blue dot isn’t exactly on a trail, as you hike and notice its movement, you should easily be able to tell where you are.
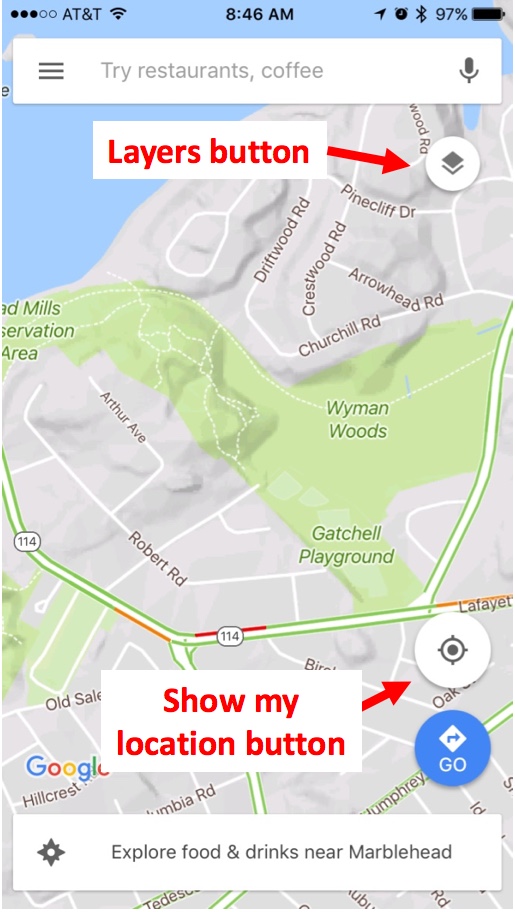
The Google Maps app offers three map views: Default, Satellite, and Terrain. Default is the street view that you’ve probably seen if you use Google Maps for navigating in your car. If you’d like to see hills and valleys, tap the Layers button (it looks like a stack of papers and is in the upper right corner of the screen) and select Terrain. (See Screen 2) Google maps can be zoomed using the pinch motion: with your index finger and thumb touching the screen, pinch them together to zoom out to show more of the map and reverse this motion to zoom in for a close-up. With Terrain selected, you can often get a better idea of the elevations by zooming out a bit.
That’s all there is to it! Now that you can find your place, you may want to pull out that paper map that you got from the map box at the trailhead or downloaded from the Conservancy’s web site (http://marbleheadconservancy.org/resources/maps/) and printed at home so you can find special spots, like views, benches, boardwalks, and natural features like streams and swamps that can’t yet be found on Google Maps.
Let us know about your experience using Google Maps by dropping us an email at info@marbleheadconservancy.org
– David Krathwohl, Trustee
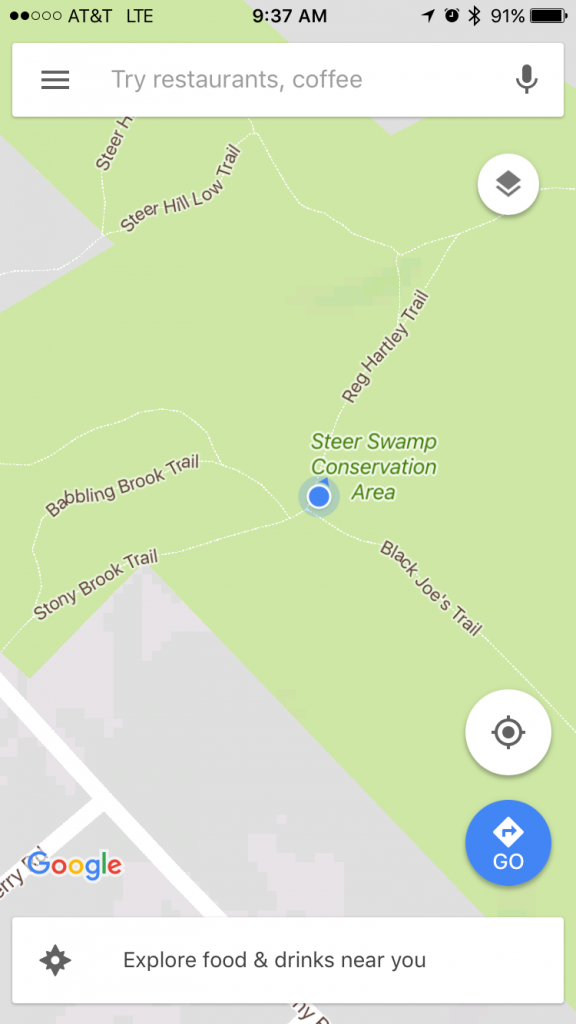
Screen 1: In this screen shot from the trails in Steer Swamp, the blue dot tells you your current location. Note that trails with names are labeled and that the pointer on the top of the blue dot shows that the phone is pointing toward the Reg Hartley Trail.
Screen 2: Use the Layers button to show the Terrain view with shadows showing hills and valleys. Use the “Show my location” button to re-draw the map around a blue dot that shows your current location.